Showing posts with label DirectAccess. Show all posts

Implementing Microsoft Remote Access Server / VPN Server End to End Solution: Installing VPN on Windows Server 2016 - Part 1

In this four part series I will be going through implementing Microsoft Remote Access Server /VPN only solution on Windows Server 2016 and integrating it with RADIUS / NPS server for Authentication then add on it Azure MFA implementation for second/Multi Factor authentication for VPN Users as sending message or getting a call on your cell phone.

So Why VPN solution ? Microsoft have a very nice solution for Enterprise customers named DirectAccess (Will have a series of articles on its implementation in Server 2016) however it has some requirements on top of them to be corporate domain joined and its not available for all windows Versions (Only Enterprise ones).

Traditional VPN fills this gap by targeting any windows version as Home and Professional and at the same time you can launch it from your home computer, tablet or mobile to connect to your corporate network. This will be very helpful especially nowadays more and more companies are supporting the idea of Bringing Your Own Device (BYOD) which of course can be any version of Windows and its not member in your domain.

Another question will be can I have one server with both VPN and DirectAccess roles co-existing together ? The Answer is Yes however one draw back is that you will loose the Null encryption and you will have to pay the penalty of the DirectAccess IP-HTTPS double encryption. In our Scenario I will go with installing the VPN role on a single server without other roles.

In Part 1 of this series, we will install the VPN Server, configure it and Enable it.

Part 2 of this Series will continue with configuring the VPN properties, integrating it with RADIUS server for authentication.

Part 3 of this series We will configure the VPN on the client machine and deal with common issues and frequent questions as accessing your Shares, DFS root from your VPN client.

In Part 4 of this series we will configure Azure MFA to add second level of authentication for VPN users connecting to our VPN server.


So let us get started by installing our VPN Server on our Windows Server 2016. This Server is 2 NIC server with 1 NIC in our Local Network and the second NIC in the DMZ

For 2 NIC server (Multi-homed server)we need to make sure of the following configuration:


  • You have only one Gateway which will be on the Second NIC (The one on DMZ or External Network), the Internal NIC will have no Gateway.                                                                                      
  • DNS servers will be specified on your internal NIC (This will be your internal DNS servers)                                                               
  • If you have multiple VLANs on your network, you won't be able to reach them from your VPN server since there is no Gateway on your internal NIC. You need to create static routes on the VPN server to these VLANs, For example if you have specific Servers subnet or other subnets as Printers or specific group then you need to create persistent route to this subnet (ROUTE ADD)


Implementing and Configuring VPN on Windows Server 2016 Standard.

  1. Open the Server Manager on your Windows 2016 VPN server and click Add Roles and Features.                                                                                                                                                                                                      
                                                                                                 
  2. Click Next and pick Role based or Feature based installation                                                                                                                                                              
                                                                                                                                                             
  3. Ensure Select a server is your option and your server name is displayed and highlighted in the Server Pool below area                                                                                                                                                                                      
                                                                                                                                               
  4. Select the Remote Access Role                                                                                                                                                      
                                                                                                                                                             
  5. Click Next - Add features and then select the first option Direct Access and VPN (RAS) as per the below screen shots                                                                                                                                                                                              


  6.  Click Next for the Web Server (IIS) role installation (This is mainly needed for your Direct Access implementation - Don't forget we picked the role that allow us to install both options, VPN and Direct Access). Click Next on the next screen for the IIS roles services.                                                                                                                                                                                                                   
                                                                                     
                                                    
  7. Confirm all your settings and check the Restart the destination server if required and go ahead for Install - It will take few minutes for the installation.                                                                                                                                                                                                                  
                                                                                                                                              
  8. After Installation is done you will get the option to configure the server with the warning sign displayed in your server manager as shown below. I would highly recommend not doing it this way so you can have better and full control on your configuration                                                                                                                                                                                                                                                                                                          
                                                                                                    
  9.        Instead from Tools, open Remote Access Management - Direct Access and VPN  - Pick the second option Run Remote access setup wizard and choose to deploy VPN only                                                                                                                                                                                                                                                                                                                                                                   


  10. Right Click on your server name - Configure and Enable Routing and Remote Access - Choose Custom Configuration - VPN access and click Finish (Check below screen shots)                                                                                                                                                                                                                


  11.  Your services will restart and the Remote access Service is up and running now and ready for configuration and Usage.                                                                                                                                                                                          
                                                                                                                                                              

                                                                                                                                                                    So in Part 1 of this series we installed and enabled the VPN only role on our Windows server 2016 box. In the next part we will start configuring the VPN properties and integrate it with our RADIUS server. Hopefully you enjoyed this part and see you on the next part.


Part 2 of this series http://itcalls.blogspot.com/2016/10/implementing-microsoft-remote-access_30.html

Part 3 of this series http://itcalls.blogspot.com/2016/11/implementing-microsoft-remote-access.html

Part 4 of this series http://itcalls.blogspot.com/2016/11/implementing-microsoft-remote-access_5.html


    Your computer is not configured correctly for Directaccess. IPV6 is not enabled correctly

    Few users reported recently that their DirectAccess is not working on their Laptops and its displaying the message "your computer is not configured correctly for directaccess. ipv6 is not enabled correctly"

    I checked DirectAccess Group policy and the Machine certificate and they were all fine. Its mainly IPV6 in question. Microsoft added native support for IPV6 and its enabled by default starting from Windows Vista and Server 2008. Some users try to disable IPV6 by unchecking the IPV6 option/check box from the Network card properties however this won't disable IPV6.

    Microsoft released several Fixit (One click file) to enable, disable or give preference for IPV6 on IPV4 or vice verse instead of digging deeply in the registry to enable or disable IPV6.

    Please check these several Fixit on http://support.microsoft.com/kb/929852

    In our case IPV6 was disabled and need to be enabled either by using one of the Fixit provided in the link above or by checking the registry as follows:

    1. Locate the following Registry key  HKEY_LOCAL_MACHINE\SYSTEM\CurrentControlSet\Services\Tcpip6\Parameters\
    2. Check for  DisabledComponents under the above key.
    3. To Enable IPV6 make sure this key has value of Zero or just delete it. If it has any other value IPV6 won't work correctly.


    Hopefully this can help anyone encountering the same issue.


    UAG Direct Access client Fail to connect. DA is configured and disabled.

    I got couple of users using Windows 7 reporting that they can't connect using Direct Access anymore whether its HTTPS or Teredo, DA just won't work. Upon further discussing the issue with them they mentioned that they enabled and disabled the Direct Access Connectivity assistant (DCA) Use Local DNS couple of times in an effort to work it out.

    We started troubleshooting by checking the Name Resolution Policy table and we noticed that the NRPT was not getting applied on the DA client as shown below.


    The next step was checking the DA resolution using the netsh dns show state command and it turned to be disabled.


    Name Resolution Policy Table Options
    --------------------------------------------------------------------

    Query Failure Behavior                : Always fall back to LLMNR and NetBIOS
                                            if the name does not exist in DNS or
                                            if the DNS servers are unreachable
                                            when on a private network

    Query Resolution Behavior             : Resolve only IPv6 addresses for names

    Network Location Behavior             : Never use Direct Access settings

    Machine Location                      : Outside corporate network

    Direct Access Settings                : Configured and Disabled

    DNSSEC Settings                       : Not Configured


    The DA client already has the correct group policies, certificates but its disabled.

    The next step was checking the below registry key:

    "HKEY_LOCAL_MACHINE\SOFTWARE\Policies\Microsoft\Windows NT\DNSClient EnableDAForAllNetworks"

    The value of the key was set to 2 which means that DA is disabled !

    Upon deleting the registry key, the DA started working normally without any problem.

    For more information about the EnableDAForAllNetworks and its different values please check the below URL. 


    On both cases that i have seen so far the reason was playing with the DCA settings (Use local DNS) which triggered the flipping of this registry key from Automatic to disabled.


    Hopefully this could help someone with the same problem.


    UAG 2010 SP4 Released to support Windows 8.1 and IE 11

    Good news for all Microsoft UAG 2010 users, Service Pack 4 (SP4) was released officially yesterday to support Microsoft Latest Operating system Windows 8.1 and Internet Explorer 11 (IE 11). This new SP4 provides other important features as the support of Remote Desktop Connection RDC 8.1 and the Remote Apps published from Remote Desktop session Host on Windows 2012 or 2012 R2.

    The Link to download the Latest SP4 is as follows:

    https://www.microsoft.com/en-us/download/details.aspx?id=41181


    For More details about features and fixes included in this Service Pack, please check the following link:

    https://support.microsoft.com/kb/2861386


    Service Pack 4 includes some other fixes as well as stability and performance enhancements, I will give it a try and hopefully it will be smooth operation.


    Error 0x803100B7 Group Policy settings require the creation of a startup PIN, but a pre-boot keyboard is not available on this device

    I Purchased few weeks ago the Microsoft Surface Pro tablet, its a very nice production tablet that really enables remote users to run their production applications and workloads. There are still some room of improvement to get promoted as the number one choice of tablets for business users. From my point of view the three main things that need improvement are the Battery Life, 3G/4G connectivity option and better Camera.

    Surface Pro comes with windows 8 Professional which is very nice and allows you to join your corporate network however it lacks a great feature which is Direct Access ! So I decided to turn it to fully productive device and install windows Enterprise on it. Its very simple as if you are building a new normal fresh computer.

    I formatted the Surface drive however I kept the recovery image (for any future need), after finishing Windows Enterprise I installed the latest Surface Pro Firmware and Driver Pack http://www.microsoft.com/en-eg/download/details.aspx?id=38826

    Finally I got my DirectAccess working on my Surface. That was really an exciting moment. Th next challenge was joining my domain MBAM/Bitlocker policy. Our MBAM / Bitlocker policy requires the use of a PIN while booting the computer. When the MBAM encryption wizard started I got the error 0x803100B7 Group Policy settings require the creation of a startup PIN, but a pre-boot keyboard is not available on this device and by checking the event viewer the following details were provided as per attached image


    To Fix this issue we need to change/enable few settings in the Surface Local Policy.

    Note: In order to use the Pre-authentication you need to have a Keyboard attached to the surface during the boot, You may use the Surface Touch/Type Keyboard or any external Keyboard connected to the USB port.

    1. Type GPEDIT.MSC in the Run bar to access the local Group Policy Editor
    2. Drill down to Computer Configuration - Administrative Templates - Windows Components - BitLocker Drive Encryption - Operating System Drives
    3. Enable both "Require Additional Authentication at Startup" and "Enable use of BitLocker authentication requiring preboot keyboard input" - Check below image.


    After that restart the Bitlocker Management Client Service to kick in back the MBAM wizard which should complete normally without any problem. 


    Windows 7 UAG Direct Access Clients Cannot RDP Server 2012 Domain Controllers

    After upgrading our domain Controllers, DNS and DHCP servers to the latest Windows Server 2012, I noticed that our Windows 7 UAG DirectAccess clients are not able to RDP (Remote Desktop/MSTSC) to the new Server 2012 Domain Controllers. The same client can ping the 2012 Domain Controller and 2012 DNS server without any problem however all RDP traffic fails.


    The weird thing was that at the same time these clients (Windows 7 DirectAccess UAG clients) can ping and RDP/MSTSC any other Windows 2012 member server without any problem at all.

    I did some intensive checks and research on the Internet but could not find anything regarding Server 2012 domain controllers issues with UAG based Direct Access, As per Microsoft Escalation team recommendation we did a full tracing scenario on both the UAG and Windows 7 client. 

    I tried to reproduce the problem while turning simultaneous capture on both the client and the UAG server using the below Scenario


    Netsh wfp capture start

    netsh trace start scenario=directaccess capture=yes report=yes

    Tried both RDP and Ping to the Problematic Windows server 2012 domain Controller

    Netsh trace stop
    Netsh wfp capture stop


    After Analyzing the captured logs, it was noticed that the DA client is using an Expired Security Association when it cannot access the 2012 server. Tracing from UAG server showing the RDP traffic dropped on UAG Server due to the following error. 

    “STATUS_IPSEC_WRONG_SA”

    Resolution:

    This problem was fixed by installing the hotfix for IKEEXT.dll on the UAG 2010 DA server and on the Windows 7 DA client. It should be noted that this fix is only for 2008R2 servers and Windows 7 Clients

    2801453-Delay during IPsec renegotiation on a computer that is running Windows 7 or Windows Server 2008 R2


    After installing this fix on both the UAG server and Windows 7 client, i was able to RDP/MSTSC the 2012 Domain Controller/DNS without any problems.


    Running Lync 2013 client on DirectAccess Computer

    I am a big fan of Microsoft DirectAccess technology, for those who are not aware of DirectAccess, Its Microsoft new Remote connectivity solution where users on the Internet get Intranet connectivity to their corporate network without installing any client or initiating any software like old traditional VPN.

    Microsoft DirectAccess is purely based on IPV6 and Lync 2013 is fully supporting IPV6 and Lync 2013 clients using DirectAccess should work without any problem.

    If any one encountered problems making Lync calls or connecting to Lync on a DirectAccess Computer then you need to ensure that IPV6 is enabled on the Lync 2013 Server as per the below image.


    This can be achieved as follows:

    1. Open the Lync 2013 Topology Builder from an old file or download the topology
    2. Edit the properties of the Lync server and in the General Properties ensure that IPV6 is enabled.
    3. These settings need to be published from the Action Menu - Topology - Publish

    Now you can enjoy Lync 2013 over DirectAccess Connection.


    Microsoft UAG DirectAccess Clients Cannot Reach and Ping your Partner/Newly Acquired Company Network

    Its quite often that many corporations acquire a new company or merge with another company with different domain name, subnets................etc. DirectAccess clients in one company cannot reach or ping the different resources, servers, routers..........etc in the other side (acquired/partner company). This can be solved by modifying your DNS infrastructure and UAG DirectAccess Settings as per the following steps:

    1. Configure the UAG server to have an IPV4 route to the new acquired network(s). 
    2. Make sure that the new acquired Network(s) are added to the UAG internal Networks. This can be done from the UAG Admin Menu – Network Interfaces – Define Internal network IP address range.
    3. The DNS servers used by the UAG and DirectAccess clients should be configured to resolve the acquired/Partner Domain either by having their DNS zone or by using conditional Forwarders.
    4. Configure your DirectAccess clients to use a DNS suffix search list. This list should include their current original company domain and the newly acquired domain. You may want to test it manually to ensure its working however its preferred to be done on the UAG DirectAcccess clients OU using Group policy as per attached.
    5. DNS Suffix Group Policy for DriectAccess OU in Active Directory
    6. Microsoft UAG need to be configured to ensure that the client’s NRPT (Name Resolution Policy Table) instructs the client to contact UAG for name resolution of the acquired domain. This will be done from the DirectAccess UAG configuration Step 3 (Infrastructure Servers – DNS Suffixes) as shown below
    7. UAG DirectAccess configuration step 3 Infrastructure servers
    8. Apply the new config/policy and Activate the UAG.
    9. Finally run gpupdate /force on the client to refresh the client group policy. To ensure that the policy is updated on the DirectAccess client you can run the “netsh namespace show pol”.


    DirectAccess IPHTTPS interface qualify over Teredo

    Its been noticed on several Direct access deployments that the Client IPHTTPS interface gets connected first over the Teredo interface although nothing is preventing the Teredo interface to get activated. Most of the clients won't prefer the IPHTTPS because of its high overhead and low performance compared to Teredo or 6to4. After some investigation and consulting Microsoft esclation engineers it turned out that its a well known issue on several clients where the Teredo and IPHTTPS race together and IPHTTPS wins at the end due to timing issues. This is elaborated in details on the following Microsoft Technet article http://technet.microsoft.com/en-us/library/ee844161(WS.10).aspx


    As per that attached below image extracted from the above mentioned article that this issue can occur and IPHTTPS will win and get qualified first.

    IPHTTPS qualify over Teredo due to timing issues

     To test whether my client is in this condition, i ran IPCONFIG /ALL on my client machine and i noticed that i have public addresses on both my Teredo and IPHTTPS interface as per attached.

    Both IPHTTPS and Teredo interface have public IP address


    To make sure you are using always Teredo you can implement one of the following workarounds:

    1. Disable IPHTTPSinterface from the Device Manager - View Hidden devices - Network adapters (unless you need IPHTTPS in locations where Teredo UDP port is blocked)
    2. After logging and connecting using the IPHTTPS, Restart the "IP Helper" Service.


    For more information about this issue please check Tom Shinder article http://blogs.technet.com/b/tomshinder/archive/2010/08/24/why-are-both-the-teredo-and-ip-https-interfaces-active.aspx

    Also its recommended to patch the UAG/Direct Access server with the latest fixes related to Direct Access, the most recent updates/fixes are as follows:

    http://support.microsoft.com/kb/2686921
    http://support.microsoft.com/kb/2633127
    http://support.microsoft.com/kb/2680464


    Windows 7 Direct Access Client Troubleshooting – Part 1 – Client Transition Technologies

    During the past few months I was heavily engaged with different DirectAccess implementations and passed by several interesting issues/problems. The Direct Access Wizard is so simple and normally things get working from the first time however sometimes things can go wrong.

    In this article series I will try to go through several troubleshooting items moving from the basic commands to more advanced issues.
    First of all we need to ensure that the Direct Access components on the Windows 7 client are running and functioning normally. The basic steps are as follows:


    1. From the Start Menu - Right Click Computer Object – Properties – Device Manager – View (Show Hidden Devices) – Expand Network Adapters – Ensure the “IPHTTPSinterface” and “Teredo Tunneling Pseudo-Interface” are enabled.
    2. From the Services, Check the “IP Helper” service startup type is Automatic and the status is up and running.
    3. IPconfig /all to check which interfaces are up and which interfaces have IPV6 address.
    4. Ensure the Machine is located outside the Corporate Network by running the following command:


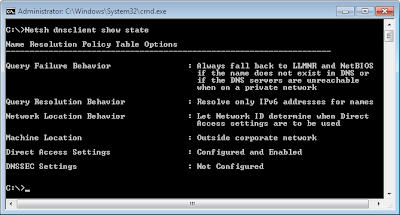
              Netsh dnsclient show state

    Netsh dnsclient show state


    Which Transition Technology is my DA client using?

    1.       If the Direct Access client has a public IPV4 address (Assigned to its Ethernet or Wireless NIC) and the IP Protocol 41 is allowed on Company Corporate Firewall/UAG/TMG then the client will connect using the 6to4 Transition Technology
                The Three main Netsh Commands that should be used for Troubleshooting are:
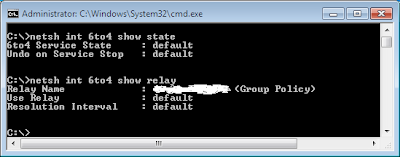
    ·         Netsh interface 6to4 show state (The State should be Default or Enabled, Disabled means the DA client will never bring 6to4 Interface up)
    ·         Netsh interface 6to4 show relay (This should list the First Consecutive public IPV4 address configured on the DA server)
    ·         Netsh interface 6to4 show interface (Displays the Configuration Information)
    ·         For detailed 6to4 Troubleshooting  http://technet.microsoft.com/en-us/library/ee844172(v=ws.10).aspx

    Troubleshooting 6to4 interface


    2.       If the 6to4 Interface didn’t come up (For DA clients with public IPV4 Addresses) then the DA client will automatically fall back to IPHTTPS Interface connection.
                      The main Netsh command for IPHTTPS is:
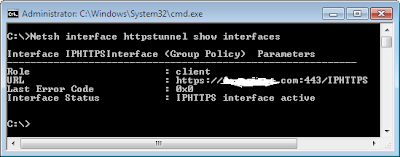
    ·         Netsh interface httpstunnel show interfaces (This will list the IPHTTPS URL and the status were active means the Interface is up and running, deactivated mostly means the DA client is connected using other transition technology)
    ·         For detailed Direct access HTTPS troubleshooting  http://technet.microsoft.com/en-us/library/ee844126(v=ws.10).aspx


    Troubleshooting IPHTTPS interface


    3.       If the DA client is behind a NAT device then it should connect using Teredo provided that Port 3544 (UDP) is enabled and allowed all the way to the DA Server
                      The main Netsh command used with Teredo is:

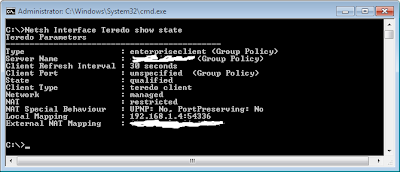
    ·         Netsh Interface Teredo show state (If the state is qualified then Teredo is functioning normally, otherwise there will be a problem mostly with the UDP port blocked)
    ·         For Detailed Teredo Troubleshooting  http://technet.microsoft.com/en-us/library/ee844188(v=ws.10).aspx

    Troubleshooting Teredo connectivity


    4.       If the Teredo didn’t work (Clients behind NAT) then the DA client will fall Automatically to the IPHTTPS option (Step 2)


    Troubleshooting Direct Access Teredo connectivity on Forefront UAG 2010

    I encountered a problem on one of my installations for DirectAccess where all the clients were able to connect to DirectAccess using HTTPS only. After several investigations and with the help of senior Microsoft Engineers we noticed that the Teredo IPV6 route is missing on the server. When the server is trying to respond to Teredo requests, it uses the default Route (6to4) instead of the server Teredo Adapter due to the following route entry:

    UAG cannot respond to Teredo


    To fix this issue you need to manually add the Teredo route as follows:


    1. We need to obtain the Teredo Adapter interface index (IDX) from running the following elevated command on the UAG server “netsh int ipv6 show int
    2. Add the route manually (using the obtained IDX from the earlier step) as follows:

    Adding Teredo Route manually to UAG 2010 routing table


    Publishing Direct Access Web Monitor on UAG Portal

    Recently I tried publishing the UAG Web Monitor on my External HTTPS Web Portal, the UAG web monitor is very useful monitoring and reporting web application which gives you the ability to view different UAG sessions, applications, Direct Access and the UAG event viewer.

    When the UAG Web Monitor is published on the UAG Portal Trunk everything works fine except the Direct Access section (Current Status and Active Sessions). When you try to open the Current Status or Active Sessions you get the below error screen.

    UAG web monitor


    This issue looks like a bug with the UAG and I opened a support case with Microsoft and they are considering a permanent fix. Currently to fix this issue you need to add 5 rules as follows:

    1. Go to the Trunk Configuration - Configure Trunk Settings - Configure - URL set.
    2. Copy any Web Monitor default rule and paste it 5 times
    3. Modify/Add the URL in the 5 rules as follows:
      1. /damonitor\.asp
      2. /damonitorcurrentstatus\.asp
      3. /damonitorcurrentstatusrefresh\.asp
      4. /damonitoractivesessions\.asp
      5. /damonitoractivesessionsrefresh\.asp
    4. Save- Activate and this should fix the issue.

    Here is a Screen shot of how these rules should be added and modified.

    UAG advanced Trunk configuration