What does Ram 1Rx8 VS 2Rx8 for RAM Means Compatible? Well Explained

Well Explained What does Ram 1Rx8 Mean VS 2Rx8 for RAM Also Compatible?

Question = Are a 4GB 1Rx8 PC3L 12800S and a 4GB 2Rx8 PC3 12800S compatible? What do 1Rx8 and          2Rx8 mean? Can I put them together?

Answer is simple = 1Rx8 means the memory chips are on one side of RAM module & As in 2Rx8 means memory chips are on the both sides of the RAM module.

Compatibility is generally not an issue in most cases. But you should go through the motherboard manufacturer's guide of supported RAM modules just to make sure if they are compatible or not.

Coming to the PC3 and PC3L part, PC3 RAMs requires an operating voltage of 1.5V whereas PC3L requires an operating voltage of 1.35V. The 'L' in PC3L signifies Low Voltage. So using PC3 RAM in a PC3L RAM slot will not provide it sufficient voltage and it will fail to operate. On the other hand using a PC3L RAM in a PC3 RAM slot may damage it due to overvoltage. So PC3 and PC3L RAMs are not compatible with each other.

So in short 1Rx8 PC3L 12800S and 2Rx8 PC3 12800S RAMs are not compatible with each other. But if it is only the 1Rx8 and 2Rx8 in concern, they may be compatible with each other but it's best to check the motherboard manufacturer's list of compatible RAMs.

Also know PC3 vs PC3L memory Explained


Two customer-accessible/upgradable memory module slots DDR3 PC3-1600-MHz dual channel support Supports 16384-MB of system RAM in the following configurations: ● 16384-MB (8192-MB×2) ● 8192-MB (8192-MB×1 or 4096×2)

The specified memory is 1.5 volt. DDR3L will run at either 1.35 or 1.5 volt but I generally avoid mixing voltages. That is why the DDR3L is working for you and I assume you have 2 of the same in the laptop with 8 gigs.


Can you figure out what is in the 4 gig machine now? I would not mix voltages or density...i.e would not have one module with 8 black blocks and one with 4. Try to match the existing 4 gig module is what I am saying...not the exact brand of memory but the characteristics of it. 

LepideAuditor Suite Review

Securing the Infrastructure and company domain is one step and auditing is another step that works side by side to close any gap. Unfortunately some system admin or security admins invest time, effort and money in several solutions and devices to protect their network under the assumption that these devices or software are working out of the box with no need to continuously monitor and audit them.

Most of your domain infrastructure as Active Directory, Exchange, File servers, SQL.........etc generate a lot of log files and we as administrators tend to turn on logging for everything but the question is do you periodically check these intense detailed deep logs and the answer is that only few admins periodically check it while others will only check the log when a problem occur as User lockout, file deletion............etc

Auditing is very crucial and it need to be done periodically and not after the fact, you need to have a system that fully audit your Infrastructure and generate easy to use reports and provide the capability to customize your reports as per your domain. This will help draw a baseline of your environment and alert you with any abnormal behavior. Being proactive and fully visualizing your environment will surely pay off than being reactive.

During the last week i have been reviewing the LepideAuditor Suite and I thought of sharing my feedback for this Audit tool starting by the setup, configuration till the reporting phase.

Setup and Installation:

  1. The full auditor suite can be downloaded from Lepide website, the trial version runs for 15 days with all needed features.                                                                                                                      
  2. The Suite was installed on a Windows 10 (1703) machine.                                                                        
  3. SQL 2016 Express was installed and a DB for Lepide was created (Installed SQL Management Studio).                                                                                                                                                         
  4. Group Policy Management console need to be installed to collect/get Group policy data.                             
  5. After downloading the LepideAuditor Suite, you get a Zip folder with 4 files as shown below                                                                                                                                                                                                                          
                                                                                                                           
  6. I picked the LepideAuditor Suite and installed the EXE in this folder.                                                    
  7. It took me another 3 or 4 clicks (Next) and the suite was installed. The overall process is around 7-8 minutes.


Configuration:

  1. After Installation and opening the Lepide Icon you get prompted to either use the logged in account or another account.
  2. The Next screen is to start adding the components that you would like to Audit                                                                                                                                                                                                                                          
                                                                                                                             
  3. For the trial purpose I picked the AD, Exchange, GP........etc components which will give you great details and deep auditing on your domain, Exchange, Usernames.....etc since everything is tied to the Active directory. For the configuration type you get the Express option and the advanced option, as the name implies the express is the quicker way to setup your domain configuration with default values and you have the flexibility to change it later from the Lepide settings. I picked the Express option to get my system up and running in few clicks.                                                                                                                                                                                                                                              
                                                                                                                                                    
  4. Enter your domain credentials and pick the option of Auditing with or Without agent. I tried both and i can't see major difference regarding the audit data. For large Organizations with huge data activity the agent option can provide better option for data compression and reporting.                                                                                                                                                                                                                                                                                                                            
         
                                                                                                                                                        
  5. I picked all options on the next configuration screen, the wizard already listed all Domain controllers, Exchange servers in the environment and Group policy servers with health monitoring and change Auditing enabled.                                                                                                                                                                                             
                                                                                                                                                   
  6. The next step is to configure the SQL DB, I already installed SQL express on my PC and I created a DB named Lepide using the SQL Management studio. I entered my local machine details and picked the DB I created earlier.                                                                                                                                                              
                                                                                                                                         
  7. Finish and that's it, you have a running Auditing system for your AD, Exchange, Group Policy, User modifications in 5 clicks. LepideAuditor Suite will restart and you will get the dashboard/360view and it start pulling data within few minutes.                                                                                                                                                                                                                                    


Example of Auditing report:

I started to run several changes and check whether they are reflected in the LepideAuditor Suite, One of the changes was moving a mailbox from one Exchange DB to another Exchange DB (This is common task for Exchange admins to provide the user with better mailbox storage or even move him to the cloud)

I moved the user mailbox and after the batch move was done i checked Lepide Audit Reports - Domain - Exchange Modification Reports - MS Exchange Modification Reports - Mailbox Modifications - Mailbox Moved and it was logged as shown below.


The change is already logged in the Exchange changes from the Main Dashboard change.

Active Directory has several detailed reports including computer, user, printers, containers, OUs and many other reports.


File Server Audit Setup/Installation:

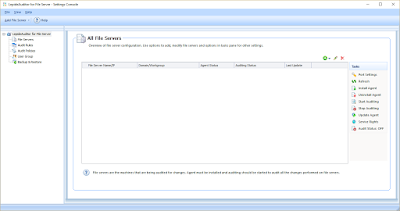
The Next thing i planned to do during my Lepide test was Auditing the file share server and the installation was straight forward as shown below:

  1. Go to Settings - Component Management and add component (File Server)                                                    
  2.  In the File server Console Settings, click on the + Icon to add the Windows File server                                                                                                                                                                        
                                                                                                                                                             
  3. You need to enter the Server IP, Domain and User credentials.                                                                                                                              
                                                         
                                                                                                                                      
  4. Enter the SQL settings. You can use an existing DB or create a new one to host your File Server Audit changes.Tracking.                                                                                                                                                                      
                                                                                                                                                  
  5. The Wizard will install the agent and then Finish.  
  6. The File Server Reports in the Audit Reports are very detailed including file modifications, deletions, permissions.......etc                                                                                                                                                                                                                                                                                     
  7. The first thing to test the FileServer Audit was to delete a test file from one of the shares and check the Audit Reports (File and Folder Deletion) for the File Server and it was clearly shown with all details on which file, who deleted, when..........etc                                                                                                                                                                                                                                                                                                                             


Compliance Reports:

One very nice feature that might be required by several organizations is the compliance reports. The LepideAuditor Suite provides detailed list for several regulatory reports.                                                                          

The Reports in general in Lepide can be easily grouped, filtered as if you are playing with native SQL reporting system with enhanced GUI options and you can save all these reports to PDF or CSV.


Health Monitoring:

This a nice feature added to the Auditor Suite which monitors the health of your servers (Active Directory, Exchange........etc) and lists the general health (Processors and RAM), services status, AD DB performance, Replication status, LDAP status, NTDS counters and many other indicators. This option is not present in several other Audit tools and i find it very beneficial.


Conclusion:

Auditing is very critical and should be thoroughly considered for all Organisations since we all depend on our systems and use them on our day to day operations, I have seen several issues that were re-mediated at early stages due to a correct audit and alerting rule. LepideAuditor Suite provides an easy to use and very simple installation and setup tool to audit your environment. The reporting will provide with huge amount of data and the nice thing is that you can customize a lot of your audit and reporting settings.


For more Information on LepideAuditor Suite - https://www.lepide.com/lepideauditor/


To download LepideAuditor Suite - https://www.lepide.com/lepideauditor/download.html


Implementing Microsoft Remote Access Server / VPN Server End to End Solution: Configuring Azure Multi Factor Authentication (MFA) for VPN connection - Part 4

In part 1,2 and 3 of this series we discussed the VPN role and its step by step installation, configuration, integration with the RADIUS server and the VPN client configuration with the main common problems from the client side

For more information, please check Part 1, 2 and 3 from this series.

https://itcallswin.blogspot.com.eg/  search :)

In this final post we will be adding to our solution the Multi factor Authentication using Azure MFA On-premise server. The MFA will add an extra security layer instead of depending only on the User name/Password. We will be using the model of something you know (Which is your password) + something you have (which is your device - Cell phone)

If you have Azure Active Directory Premium or Enterprise Mobility suite (EMS) then you already have the Azure MFA included. For more details on Azure MFA licensing and pricing, please check the below link

https://azure.microsoft.com/en-us/pricing/details/multi-factor-authentication/


Installing and Configuring Azure MFA On-Premise Server


  1. Log in to your Azure Portal - Active Directory - Multi factor Authentication Providers. If you have a provider you can directly manage it however if not as in our case you need to create an Authentication Provider                                                                                                                                                               
                                                                                                                                
  2. Creating one is very easy Wizard as shown below however you have to make one important decision regarding the License model (Check above link for licensing)                                                                                                                                                                                                     
                                                                                                                          
  3. After Creating the provider you will be directed to the Azure Multi Factor Authentication page where you can find downloads and pick the one that suites your environment (In our case i am installing it on 64 Bit Windows server 2016).                                                                                                                                                                                              
                                                                                                                                     
  4. I will pick the 2012 R2 version since the 2016 wasn't available at that time and generate the activation codes. Please note this activation code will last for 10 minutes only to enter it in the MFA installation wizard later, if you took more than 10 minutes before you reached the Wizard part requiring it then you will get an error. Don't panic, all you need to do is come back here and generate a new code.                                                                                                                                                                                                              
                                                                                                                            
  5. Launch/Run the downloaded file, it will require couple of components and updates to be installed as shown below (Prerequisites).                                                                                                                                                                                                             


  6. Go ahead and select the installation folder (You can safely have it in the default location)                                                                                                                                                                                                              
                                                                                         
                                                  
  7. After Installation, it will launch the configuration page - Click Next and add the activation code you copied from step 4                                                                                                                                                                                                                
                                                                                   
                                    
  8. The next option will be which service you need to apply MFA ? In our case we are applying it on the VPN service. This is is a very critical step, we will add here the VPN Server IP address and shared secret (You can use the one we used before with RADIUS). Now the VPN server Security was previously configured pointing to the RADIUS server, we need now to change it in VPN server to point to the MFA server (as if its the RADIUS server) and the MFA will connect on behalf of it to the RADIUS server.                                                                                                                                                                                                                                                                                                                                                                                 Check Part 2 of this series to add the MFA server instead of the RADIUS server directly and also check Part 2 on how to add a new RADIUS client (This time it will be the MFA server). So previously VPN server contact RADIUS directly, now Its VPN to MFA to RADIUS.                                                                                                                                                                                                                       
                                                                                     
                         
  9. Add the RADIUS server IP. Again remember the MFA is a broker now receiving requests from VPN (claiming to be RADIUS) and then contacting the real RADIUS.                                                                                                                                                                                                                                  
                                                                                 
                  
  10. After finalizing the Wizard, open the Azure MFA Server application located on the Start Window and click on Users.                                                                                                                                                                                                                   
                                                                                                                                         
  11. Pick any user to enable the MFA.  Add the Phone number and pick the MFA method (Phone call, Text, Mobile App....etc.) and then click on Enabled.                                                                                                                                                                               
                                                                                                              
  12. Make sure that the user Account in Active Directory - Dial In Tab                                                                                                                                                                                             Network Access Permission = Allow                                                                                             Call Back Options = Set by Caller (RRAS)                                                                                                    
  13. In the Azure MFA server Application - Click on Radius Authentication. On the Client you should have the IP address of the VPN server and on the Target you should have the RADIUS server IP.                                                                                                                                                                                                                                            
By that you are ready to turn on to your client and connect your VPN and it won't sign you until you pick your phone and press the # key to complete authentication.

Through this 4 blog posts, i tried to detail each and every step with screen shots to make sure nothing is missed, Hopefully you enjoyed this series and you will try the VPN solution on your devices especially the portable ones (Tablets and phones).

See you on the next post.


Implementing Microsoft Remote Access Server / VPN Server End to End Solution: Configuring VPN On Windows 10 Client - Part 3

In part 1 and 2 of this series we discussed the VPN role and its step by step installation, configuration and integration with the RADIUS server

For more information, please check Part 1 and 2 from this series.


https://itcallswin.blogspot.com.eg/


In this part we will be discussing the Client side and how to setup the VPN on Windows machines (Screen shots will be on Windows 10 machine) and common issues after installation.


VPN Client Configuration:


  1. On a windows 10 computer, open the Setting - Network and Internet - VPN and Add a VPN connection                                                                                                                                                                                                    
                                                                                                                          
  2. Connection type will be Windows (built-in) and you can pick any name for the connection name. The server name/address should be the FQDN that you have HTTPS traffic directed on your network. This name should match the name of the SSL certificate you bought and configured during the VPN (Security TAB - Please check Part 2). We will be using in our scenario SSTP as agreed (we only allowed HTTPS). Sign-in will be using Username/Password and remove the check box to remember my sign-in.                                                                                                                                                                                                         
                                                                                                                 
  3. One common issue after the user gets VPN connected being unable to connect to normal Internet sites (Google, Microsoft) because all traffic is now pushed through the VPN tunnel (Your machine looks as if its inside the domain) so if you have proxy server in your network then you need to add it to your browser. A quick fix is split tunneling where all corporate traffic go through the VPN and normal Internet traffic from your normal Wireless or Home connection.                                                                                                                                                                                                                                                                                                 In order to do this you need to go to the Network connections and get the properties of the newly created network (Test VPN in our case) - Properties - IPV4 - Advanced and remove the check box of "Use default gateway on remote network" - Check below screen shots                                                                                                                                                                                                             
                                                                                                                                                                                                                               
                                                 
  4. Now you are ready and the user can double click the Test VPN from the VPN tab in the settings or from the Wireless connections and enter his/her user name and password. Make sure to enter it in the format domain\username (remember this is Home computer or work group device with no information on your domain.)                                                                                                                                                                                                          
                                                                                                                                                              
At that point your VPN status should be connected and you are ready to access your corporate resources, applications and data.


Frequently asked questions (FAQ):

  • I can't map any share or RDP to my client/Server ?
We need always to remember that this VPN connected machine is a work group machine which is not connected or joined to your domain. Always use FQDN when connecting to resources (There is no default DNS suffix on the client and we even can't push it by Group Policy).

For example: RDP to computer.domain.com Not just computer name. Also map the share in FQDN as \\server.domain.com\share. Everything should be in FQDN. Ping by either IP or FQDN.

If you can't ping by IP or FQDN a corporate resource then its not reachable (No route on the VPN server) - Remember the internal NIC of the VPN server has no Gateway. Make sure to add the route first to all resources/VLANs on the VPN server (Manually using Route Add Command).

  • I can't map or access my DFS root shares ?
This is a very tricky situation. Logically this is normal since DFS is based on Active Directory domain structure and the VPN is a work group client who cann't connect to the domain controller and get the Server referral.

The solution is configuring the DFS to use FQDN in Referrals because its normal behavior is to reply to queries in Net BIOS names only.

To fix this issue you need to follow the below article

    Example: Your DFS server "Server01" with DFS Root "RootShare" and all users access it using \\Mycompany.com\RootShare


    Remove-DfsnRootTarget -TargetPath \\Server01\RootShare
    Set-DfsnServerConfiguration -ComputerName Server1.mycompany.com -UseFqdn $true

    Stop-Service dfs
    Start-Service dfs
    New-DfsnRootTarget -Path \\mycompany.com\RootShare -TargetPath \\Server01.mycompany.com\RootShare


    This should cover most of the issues the VPN/Work group users face while connected. Hopefully you enjoyed this part and stay tunes for our last part with the Azure Multi Factor Authentication.


    Implementing Microsoft Remote Access Server / VPN Server End to End Solution: Configuring VPN Server 2016 and Integration with RADIUS - Part 2

    In part 1 of this series we started by identifying the VPN role and why/When it should be used and we started by installing the VPN role on Windows Server 2016 and enabled the service.

    For more details please check Part 1 https://itcallswin.blogspot.com.eg
    In this part we will continue configuring the VPN role and integrating it with RADIUS server for authentication (Optional)

    Configuring VPN on Windows Server 2016


    1. We will start now where we stopped on our last post after the services are enabled. Go to Server Manager - Tools - Routing and Remote Access. You will notice that the Server name under the Server status has green indicator which means its enabled and with running services.                                                                                                                                                    Right Click on the Server  - Properties                                                                                                                                                 


    2. On the Security Tab we need to make few decisions:                                                                                                                                                                                                                         Authentication Provider: You have 2 options whether Windows Authentication (If you don't have RADIUS server on your network) which will work great by connecting to your Domain Active Directory or LDAP service and if the Server is domain joined will even make it simpler. However for our case we will go for RADIUS Authentication.                                                                                                                                                                                                               Accounting Provider: Again you have option between Windows Accounting and RADIUS accounting. With Radius accounting you will be sending connection accounting logs to the RADIUS server while Windows Accounting will save them on a file on the VPN server. I will go with Windows Accounting to keep all VPN logs in one place.                                                                                                                                                                                               
                                                                                                                                                               
    3. For the Authentication Methods, Ensure that EAP and MS-CHAP V 2 (First 2 options are selected)                                                                                                                                                                                                          
                                                                                                                                              
    4. In the Authentication Provider (After Picking RADIUS Authentication) - Click on Configure - Add - Add RADIUS Server. Add your Current Network RADIUS server name and a shared secret (This is the same shared secret/password that will be used also on the RADIUS server to validate/authenticate each other). Increase the Time out to 60 (This will be very beneficial with our MFA implementation - Wait time till you get the call or SMS on the mobile and confirm your VPN authentication)                                                                                                                                                                                                      
                                                                                                                         
    5. Now on the RADIUS server  we will create a new client and add the VPN server as a client. RADIUS Clients - New - Enable the RADIUS client and enter the name and IP address of your VPN server as well as the shared secret that we added in the VPN server (Previous step)                                                                                                                                                                                                            
                                                                             
                                                                               
    6. Back to our VPN server and we are still on the security Tab, we will add a certificate in the SSL Certificate binding option at the bottom of the page. In our Scenario we will be using SSTP connection (HTTPS) to limit ports open on the VPN server. You can use your company Wildcard certificate or create a commercial normal SSL certificate and give it a simple name as VPN.company.com. Install the Certificate on the Server and pick it from this location.                                                                                                                                                                                                              
                                                                                                                                     
    7. That's it for the Security and we will move to IPv4 Tab. We need to decide which IPs and how the clients will get their addresses. We have 2 options, whether to assign the IP addresses to the VPN clients using the DHCP or using Static Pool. If you will pick the DHCP option it will assign IPs from the same pool as your Server LAN interface. Most probably you have Server IPs / VLAN and you won't prefer to assign addresses to VPN client from this pool (You can use it only for testing).                                                                                                                                                                                                                                         So in our case we will pick the second option which is assigning IPs to the client VPN devices from a static pool. We will add a new pool from 10.10.10.1 - 10.10.10.254. This pool is different that the Server Internal NIC pool and is not in its routing table.                                                                                                                                                                                                                                                                                                                                   When users connect to the VPN server they will get an IP from this pool however they won't be able to ping or reach any of your corporate resources, this static pool will require a simple network configuration. The problem is that the VPN clients may be able to go (Half way) to your resources but the resources doesn't know how to get back to the VPN client. We need to add a route for this Pool that points to your Local VPN Server IP address (Internal NIC)                                                                                                                                                                                                                                                                                                          Let us assume that your VPN server Internal (Domain Facing) NIC has an IP address of 192.168.100.10 and as per the below screen shot your Static Pool is 10.10.10.1 - 10.10.10.254. You need to add a route on your Inter-Routing devices on your network which is most possibly your internal core switch or your Internal Router that routes and points any traffic going to 10.10.10.0 Network (VPN Pool) to 192.168.100.10. This should do the trick and allows you to access and reach your internal resources. As discussed in Part 1, this VPN server internal NIC doesn't have a Gateway (Multi-Home NIC) so it should has its own static Routes to other subnets in your corporate Network.                                                                                                                                                  
                                                                       
                                                                                        
    8. We will move to the Logging TAB and ensure the log all events and additional Routing and Remote Access information are checked as shown below.                                                                                                                                                                                                                              
                                                                                                               

    Now your VPN is properly configured and you are almost ready for your users to connect to your Remote Access / VPN server. Two more items to be checked are:

    • This Scenario is using only SSTP so you need only yo enable HTTPS traffic to your VPN server. No more ports or protocols are needed.                                                                                           
    • Make sure the Network Access Permission is allowed for each user Dial-In properties in Active Directory. You can only allow this option for users using VPN.                                                              


    We are all set now and on the next part of this series we will go through the Client VPN setup/configuration and common client scenarios. Hopefully you enjoyed this part and stay tuned for the next post.